
Understanding the health of your car battery can prevent untimely and inconvenient breakdowns.
An excellent way to accomplish this is by testing your battery periodically using a multimeter.
This simple tool can provide invaluable knowledge regarding the health and functionality of your car’s electrical system.
However, many vehicle owners feel somewhat overwhelmed when confronted with such seemingly technical tasks.
To address this, we’ve created a straight-forward, step-by-step guide.
In this guide, we’ll take you through each process, simplifying the task and offering essential tips to ensure accurate results.
Contents
- How To Test A Car Battery With A Multimeter?
- Understanding the Basics: What is a Multimeter?
- Key Reasons Why You Should Periodically Test Your Car Battery
- Step-by-Step Guide: How to Test Your Car Battery with a Multimeter
- Troubleshooting Common Problems: What If My Multimeter Reads Less Than 12.6 Volts?
- How to Interpret the Multimeter’s Results
- Understanding Car Battery Health: How Does a Battery Work?
- What to Do If Your Battery Requires a Charge or Replacement?
- Essential Tips for Ensuring Accurate Results When Using a Multimeter
- Common Mistakes to Avoid When Testing a Car Battery
- Additional Uses for a Multimeter in Your Vehicle Maintenance Tasks
- The Bottom Line
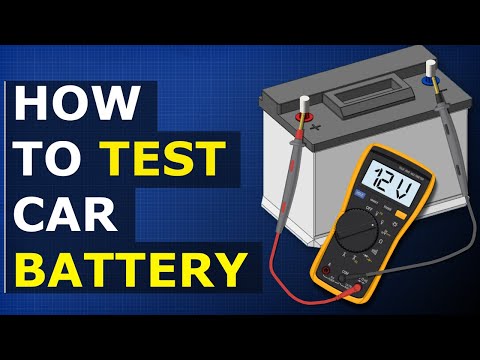
How To Test A Car Battery With A Multimeter?
To test a car battery with a multimeter, first, turn off the vehicle and disconnect the battery’s negative terminal. Then, set your multimeter to DC volts and connect the positive probe to the positive terminal on the battery and the negative probe to the negative terminal. If the multimeter reads less than 12.6 volts, the battery may need to be charged or replaced.
Delving deeper into this topic, it’s worth noting that there are several crucial nuances that can significantly influence the accuracy of your multimeter readings.
For example, understanding how ambient temperature and car use impact battery voltage can provide a more comprehensive diagnostic of your car battery’s health.
Additionally, we’re also going to discuss other methods of battery testing such as load testing and hydrometer testing, which might be needed to confirm the battery condition in complex cases.
These aspects will equip you with a well-rounded knowledge base regarding car battery maintenance.
Understanding the Basics: What is a Multimeter?
In the world of car maintenance and repairs, paving the path to familiarising yourself with your vehicle starts with understanding the different tools and devices you need, one of which is the multimeter.
Australian tool company, Bunnings Warehouse, defines a multimeter as an electrical instrument set up to measure the different aspects of electricity.
It is an essential tool available in analog or digital formats, essential in the identification and troubleshooting of electrical problems.
The Functionality of a Multimeter
A multimeter measures the voltage, current, and resistance in an electric circuit.
When used correctly, it can inform you of how much electricity is passing through your car battery, whether there exists any resistance that could be affecting electrical flow, and how well your battery is functioning based on voltage readings. This versatility is vital for maintaining your vehicle’s health.
>Embedded in its name, multimeter comes from ‘multiple’ and ‘meter’. It serves as a tool that combines the functions of various meters into one, simplifying the process for you.
The convenience afforded by a multimeter makes it an essential multipurpose tool that anyone aiming for efficient car maintenance should have within their toolbox.
While it might seem complicated at first, learning how to use one will streamline your problem-solving processes, especially when it comes to electrical issues in your car – like your battery.
Types of Multimeters
There are two main types of multimeter: analog and digital.
Analog multimeters make use of a mechanical needle to demonstrate the measurement, while digital multimeters provide a digital readout, making it easier for readings to be interpreted by the user.
Choosing between the two often boils down to personal preference, but digital multimeters tend to be the more popular choice due to their ease of usage and more accurate readings.
>It’s also worth noting that different multimeters have different functionalities, with some more advanced versions offering options to measure additional aspects such as temperature, capacitance, and frequency.
Furthermore, aside from differences in functionality, accuracy, and pricing among all multimeters, they pretty much observe the same basic principles of operation.
This means that once you learn how to use one multimeter, you’re well-equipped to handle most other varieties you may come across.

Take some time to watch this video for a visual guide on the proper usage of a multimeter.
It will also teach you how to quickly interpret the reading from the multimeter, further enhancing your skills in car maintenance and problem diagnosis.
Key Reasons Why You Should Periodically Test Your Car Battery
Car batteries are easily overlooked in the regular maintenance of your vehicle.
However, they play a crucial role in ensuring your car functions optimally.
There are multiple reasons why you should periodically test your car battery.
Preventing Unexpected Breakdowns
An unexpected battery failure can leave you stranded in unwanted situations.
To avoid this inconvenience, it’s essential to periodically test your car battery using a multimeter.
This simple procedure can alert you to potential problems with your battery before they become major issues.
Periodically testing your car battery can prevent unexpected breakdowns.
This quote emphasizes the importance of preventive maintenance for your car battery. By testing it regularly, you can detect and rectify any battery issues before they lead to breakdowns.
Moreover, a failing car battery can often display symptoms similar to other car issues. To avoid misdiagnosing these symptoms, a battery test is recommended.
Prolonging Battery Life
Batteries are subjected to wear and tear over time, potentially leading to a shortened lifespan.
However, by testing your battery periodically, you can understand its health status and take necessary measures to prolong its life.
Proper maintenance, including testing, can lead to a longer lasting, more reliable battery.
“By understanding the health status of your car battery and maintaining it properly, you can prolong its life.”
This quote clarifies that battery longevity isn’t just about high-quality products, but also about knowing how well the battery is performing via frequent testing and maintenance. In doing so, you can prolong your battery life, resulting in financial savings in the long run.
Finally, a well-maintained and tested battery can also improve the overall performance of your vehicle, making periodic testing a necessity for any car owner.
Step-by-Step Guide: How to Test Your Car Battery with a Multimeter
The process of testing your car battery with a multimeter is fairly straightforward and requires a few specific steps.
Preparing Your Multimeter
First and foremost, you need to set up your multimeter for the test.
Most multimeters have a dial that allows you to select the type of measurement you want to make.
In this case, you should turn the dial to 20 volts direct current (DC) for car battery testing.
If your multimeter has a separate battery testing function, you could also use that.
The video will demonstrate the correct way to setup your multimeter.
It also includes pointers for accurate and effective battery testing.
Testing Your Car Battery
With your multimeter set up properly, you can now begin testing your car battery.
If your car has been running, you need to turn it off and wait for about an hour before conducting the test.
This is important because the battery needs time to cool down and stabilize.
Then, place the red probe of the multimeter on the positive terminal of the battery, and the black probe on the negative terminal.
Interpreting the Results
The multimeter should now display a reading, which is the voltage of your car battery.
A healthy car battery should have a voltage of around 12.6 volts or more.
If the reading is less than this, your battery may not be in optimal health.
Your battery might require recharging or, in the worst case, replacing.
This is a clear indication of how important it is to periodically test your car battery.
Final Remarks
Learning to use a multimeter to test your car battery is not only a practical skill, but can also save you from unpleasant surprises down the line.
With a multimeter and a bit of know-how, you can ensure that your battery is always in tip-top condition.
Remember, a healthy battery keeps your car running smoothly and can prevent a variety of car troubles.
The multimeter should now display a reading, which is the voltage of your car battery. A healthy car battery should have a voltage of around 12.6 volts or more.
This statement basically summarizes the whole crux of battery testing. If your battery constantly shows readings below 12.6 volts, it’s a definite sign that you should seek professional help. This simple test can prevent many future headaches and expenses associated with a faulty car battery.
Troubleshooting Common Problems: What If My Multimeter Reads Less Than 12.6 Volts?
Experiencing a reading of less than 12.6 volts when testing your car battery with a multimeter is not uncommon
.Indeed, it may mean one of several things, all of which are important to address promptly to ensure the overall health of your vehicle.
It could indicate that your car battery is discharged or undercharged, both of which may lead to potentially significant and damaging complications over time.
Recognizing the Significance of the 12.6 Volt Benchmark
The 12.6-volt benchmark is significant because it indicates that the battery is adequately charged.
If your multimeter is showing less than this amount, it is essentially warning you that your battery may not have enough power to support the various systems in your car.
Keep in mind that a healthy, fully charged battery should generally display a voltage of around 12.6 to 12.8 volts.
Though the 12.6-volt benchmark is just a guideline, consistently obtaining readings below this value should serve as a warning that your car battery may be undercharged or potentially failing.
This quote emphasizes the importance of this guideline.
While slight deviations can occur, it’s critical not to ignore readings below this as they could indicate a serious issue.
Possible Causes of a Low Voltage Reading
A reading of less than 12.6 volts could be indicative of a variety of potential issues, all of which should be addressed.
One of the most common causes is that the battery is simply discharged, meaning it’s been drained of power due to the lights being left on, or other causes.
This is typically an easy fix, as you can often just jump-start the battery to give it enough power to start the car, and then the alternator will recharge it as you drive.
This being said, other issues might not be so straightforward.
Continuous low voltage readings can be indicative of bigger problems such as a faulty alternator, a bad battery, or even issues with the charging system in general.
This statement further underscores the fact that it’s not wise to ignore such readings.
A faulty alternator or charging system can lead to serious problems with your car in the long term.
Therefore, if you persistently notice a reading below 12.6 volts, it’s advisable to seek professional help.
Don’t wait until you’re stranded in the middle of nowhere due to your car refusing to start.
How to Interpret the Multimeter’s Results
A multimeter is an essential tool in checking your car’s battery health and function. By understanding how to interpret the readings, you save time and potentially money on unnecessary battery replacements.
Remember, a fully charged battery should read between 12.6 volts to 12.8 volts when the car engine is off. If your batter reads 12.6 volts and above, you have no immediate need to worry. Your battery is healthy.
Let’s take a deeper look into the potential results you might encounter.
Reading Less Than 12.6 Volts
If your battery reads less than 12.6 volts, it indicates undercharged status. Undercharging could arise from various issues such as poor maintenance, defective alternator or adverse weather conditions. Monitoring your voltage frequently helps you identify such issues early and take the necessary action.
To help you get a better understanding of the process, here’s a tutorial:

From this video, you will learn the practical procedure of using a multimeter to test your car battery’s status, and how to interpret various results. This practical guide will, in particular, assist in grasping the findings if you have never used a multimeter before.
Reading Above 12.8 Volts
It may seem odd, but if your multimeter reads above 12.8 volts with the engine off, this could be a cause for concern too. Overcharging could rapidly deteriorate your battery and pose a potential danger by releasing explosive gases.
Proper battery maintenance, including timely checks and charging, helps prevent both undercharging and overcharging, thus extending your battery life
The health of your battery can significantly affect your vehicle’s performance and longevity. Thus, “Understanding your multimeter readings and acting promptly to rectify any anomalies is crucial.” Being proactive about your battery health can you save you time, money and potential disaster down the line.
Battery issues don’t always mean replacement is necessary. Sometimes, all you need is a good battery charger. You could also need to adjust your alternator or improve your maintenance practices.
In conclusion, understanding how to interpret the multimeter readings helps you stay ahead of potential battery problems timely and accurately. This frequently overlooked routine might be the difference between a smooth ride and an unexpected breakdown.
So, use that multimeter, understand the readings, and let’s keep your battery healthy!
Understanding Car Battery Health: How Does a Battery Work?
The complexity and intriguing mechanisms of car batteries often go unnoticed, but understanding their functionality can help you maintain their health for longer periods.
The Basic Anatomy of a Car Battery
Car batteries, also known as automotive batteries, are a type of rechargeable battery that supplies electric energy to your vehicle.
Amazingly, they have a multi-cell structure, which essentially means they are composed of numerous ‘smaller batteries’ or cells connected in a series that work together to produce the required power.
Each cell in a battery contributes approximately 2.1 volts to the total voltage of the battery.
This means that a typical 12-volt car battery would contain approximately 6 cells. These cells are contained within a hard plastic casing, and each one is divided internally by separators.
The separators prevent any conductive blending of the cell’s components, therefore, ensuring the effective functionality of the battery.
The Chemistry that Powers a Car Battery
The power generated by a car battery is a result of a chemical reaction known as a reduction-oxidation (redox) reaction.
Each cell of a battery contains two plates submerged in a solution of sulfuric acid. One plate is made of lead (Pb), while the other is composed of lead dioxide (PbO2).
When a load is applied (like starting your car), the sulfuric acid (H2SO4) reacts with the lead and lead-dioxide plates, resulting in the production of lead sulfate (PbSO4), water, and most importantly, electrons.
This electron production is what makes your battery capable of delivering electrical power.
These electrons have a natural tendency to move towards the battery’s positive terminal, but when you switch your car on, they are forced into your car’s electrical system, powering everything from the engine starter motor to your radio system.
Once you start your vehicle, the alternator kicks in to recharge the battery by reverting the chemical reaction.
Importance of Regular Maintenance
While car batteries may seem infallible, they tend to lose their charge and overall capacity over time due to a number of reasons such as stray parasitic loads, poor maintenance, and extreme weather conditions.
Stray parasitic loads include things that continue to draw power even when the car is off like the alarm system, digital clocks, or even corroded or poorly insulated cables.
Regular maintenance and monitoring can help improve a car battery’s lifespan and performance.
This is where understanding how your car battery works proves beneficial. Knowing the signs of an unhealthy battery can allow you to address issues before they lead to a flat battery or expensive damage to your car.
In conclusion understanding the underlying processes that govern the operation of car batteries should empower you to take a proactive role in their maintenance.
What to Do If Your Battery Requires a Charge or Replacement?
Discovering a low battery power reading on your multimeter can be alarming, indicating that you might need a charge or replacement for your car battery. Knowing how to properly respond in such a situation can save you significant time and inconvenience.
It is essential to remember that car batteries are not designed to last forever and their performance may degrade over time due to frequent use, temperature conditions and other factors. Therefore, determining whether your battery requires charging or a full replacement is crucial for your vehicle’s proper operation.
How to Charge a Car Battery
The process of charging a car battery is fairly simple and can be done using a battery charger. First, you need to disconnect your car battery from the vehicle, ensuring the battery terminals are free from dirt or corrosion.
Subsequently, connect the charger to the battery, maintaining the correct polarity. Typically, red stands for positive and black for negative. Each model of charger works differently, so it’s important to read the instructions carefully.
Set the charger to the appropriate voltage and let the battery charge. Once fully charged, disconnect the charger before reinstalling the battery in your car.
Using a quality charger and following the manufacturer’s instructions can ensure your car battery is correctly charged and its lifespan is maximized.
It’s crucial to note that inappropriately performing a charge can lead to battery damage or even cause a hazard. So if you’re unsure, seek professional help.
When to Replace a Car Battery?
Usually, a car battery lifespan ranges from three to five years. However, extreme temperature conditions, frequent short drives, or leaving your headlights on when the vehicle is off, can shorten its lifespan.
If your battery constantly requires a jumpstart, or your vehicle struggles to start even after a full battery charge, these could be signs that your battery needs a replacement.
A battery replacement can be performed at home or at a professional mechanic’s shop. Buying a new battery might seem costly but, continually jumping a dying battery can cause damage to your car’s alternator and electrical system which could complicate matters and incur a larger expense.
Regular testing and preventive battery maintenance can keep your car battery healthy for longer and help you avoid unexpected replacements.
Whether it’s simply charging the battery again or replacing it entirely, following these steps carefully and diligently can reassure your car’s functionality and dependability.
This insightful video can provide you with a practical demonstration on how to use a multimeter to test your car battery. Additionally, it offers invaluable tips and tricks to ensure accurate readings and effective battery maintenance.
Essential Tips for Ensuring Accurate Results When Using a Multimeter
When using a multimeter to test your car battery, it’s crucial to ensure the most accurate results possible. Incorrect measurements can lead to a variety of problems, including misdiagnosis of your battery’s health and potential damage to your vehicle. Here are some tips to help guide you!
Ensuring a Good Connection
One of the most critical factors in obtaining accurate multimeter results is ensuring a good connection between the test leads and the battery terminals.
If the test leads are not securely connected to the battery terminals, the multimeter might provide inaccurate or inconsistent readings.
To prevent any misreadings, always clean the battery terminals before testing and ensure the test leads make good, solid contact.
Using a wire brush to remove any corrosion is an effective way of cleaning the terminals. Solid contact helps in transferring the correct voltage to the meter, leading to more accurate readings.
Proper Multimeter Settings
Another crucial aspect of using a multimeter is setting it to the correct mode. There are various modes on a multimeter like resistance, current, and voltage.
You should set it to ‘DC voltage’ when measuring your car battery as the car battery emits Direct Current (DC).
Using the wrong mode can lead to inaccurate readings and could potentially damage the multimeter. Always double-check the settings before you start the testing process.
Operating manual of the multimeter usually provides clear instructions on selecting the appropriate mode for different testing scenarios. This not only enhances accuracy but also lengthens the longevity of your multimeter.
Allow the Car Battery to Rest
Lastly, let your car battery rest before testing can be a game-changer. Batteries can give you false high readings immediately after use, which makes them appear healthier than they truly are.
Therefore, it is advised to let your car rest at least an hour before you test with a multimeter.
Letting your battery ‘rest’ allows it to return to a more neutral state, offering astonishingly accurate multimeter readings.
This not only helps in measuring the state of the battery but also gives you an insight into how well your battery preserves energy when the vehicle is off.
Common Mistakes to Avoid When Testing a Car Battery
Testing a car battery with a multimeter can provide vital information about the battery’s health. However, it’s imperative to perform the procedure correctly to avoid inaccurate results or potential harm.
Incorrect Multimeter Setting
One common error is using the incorrect setting on your multimeter.
Most multimeters come with a variety of options or modes, including voltage, current, resistance, and more.
When testing a car battery, remember to set the device to measure Direct Current Voltage, often represented by ‘V-’ or ‘DCV’ on the multimeter.
Using the incorrect setting can lead to a wrong interpretation of the battery’s condition and may also potentially damage the multimeter.
Correctly setting your multimeter ensures accurate readings and prevents potential device damage.
When in doubt, it’s always wise to consult the multimeter’s user guide or seek expert advice.
Not Checking for Parasitic Draw
Another common mistake is neglecting to check for a parasitic draw on the battery.
This usually happens when an electrical device in your car continues to drain power from the battery even after the ignition is turned off.
If left undiagnosed, a parasitic draw can significantly reduce the battery’s lifespan and lead to frequent ‘dead battery’ situations.
Therefore, aside from testing the battery’s voltage, it’s also crucial to check for any unusual power drain.
Checking for parasitic draws ensures you’re not just looking at the symptom (dead battery), but also addressing the possible cause.
Fortunately, a parasitic draw can also be detected using a multimeter.

In the embedded video, you’ll learn how to use a multimeter to detect a parasitic draw. The process is quite straightforward and can be mastered with a bit of practice.
Using a Faulty or Expired Multimeter
Lastly, never attempt to test your battery with a faulty or expired multimeter.
A faulty multimeter can provide inaccurate readings, leading you to make the wrong decisions about your battery’s health.
Avoid this pitfall by ensuring your multimeter is in good working condition before use.
Also, regularly check the expiry date printed on the multimeter as the accuracy of these devices often declines with age.
Always confirm your multimeter is in excellent working condition to guarantee accurate car battery testing.
In conclusion, by avoiding common errors such as incorrect multimeter settings, not checking for parasitic draws, and using faulty equipment, you can ensure accurate car battery tests each time.
Additional Uses for a Multimeter in Your Vehicle Maintenance Tasks
A multimeter is not just a tool for testing your car battery; it has a myriad other uses in your automobile maintenance tasks.
Checking the Alternator
One of the crucial roles your multimeter can play is in verifying the performance of your alternator.
While the battery powers the vehicle when off, it’s the alternator that takes over once your engine is running.
If the alternator fails, your battery will quickly drain, leaving you stranded.
By simply attaching your multimeter’s probes to the battery while the engine is running, you can assess the health of your alternator.
A healthy alternator should register a voltage between 13.4 and 14.7 volts.
Identifying Blown Fuses
Blown fuses can cause several electrical components in your vehicle to stop functioning.
These can include your radio, lights, power windows, or even your vehicle’s chargers.
Using a multimeter, you can quickly identify these blown fuses and replace them to restore functionality.
A bad fuse will show no continuity, while a good fuse will register a very low resistance, near zero Ohms.
By implementing the use of a multimeter, you can diagnose and rectify electrical problems in your vehicle before they worsen into significant, potentially costly issues.
This quote emphasizes the importance of understanding and using a multimeter effectively.
Not only can it save you money, but it can also prevent inconvenience and potential roadside disasters.
Measuring Resistance
A multimeter can also measure the resistance of electrical components within your vehicle.
This ability is helpful if you suspect an issue with a component that relies on a specific amount of resistance to operate correctly.
For instance, a fault fuel level sensor or bad spark plug wires can be pinpointed by measuring their resistance.
By doing a resistance test, you can determine if replacement components are necessary, or if the existing part is still operable.
Testing Light Bulbs
Another use for your multimeter is testing the light bulbs in your vehicle.
If a light is not working, it may not necessarily be the bulb that’s at fault.
It could be an issue with the wiring, the fuse, the switch, or the bulb itself.
By using your multimeter to test the bulb, you can quickly rule out one potential cause and move on to troubleshoot the rest.
In conclusion, a multimeter is a handy tool that, when used correctly, can significantly enhance your vehicle’s maintenance capabilities.
From testing your alternator and identifying blown fuses to measuring resistance and testing bulbs, a multimeter helps to keep your vehicle running smoothly and efficiently.
The Bottom Line
Maintaining your car battery health is crucial to ensure your vehicle’s smooth and efficient performance.
By using a multimeter, you can easily assess your battery’s condition, interpret its reading accurately, and address any potential issues promptly.
This skillful usage of a multimeter isn’t limited to just assessing the battery but it extends to other sections of vehicle maintenance as well.
Avoid common mistakes while testing, follow the correct steps, and understand the multimeter results to prolong your battery life and ensure its optimal functioning.
In the event of a low reading, be prepared to charge or replace your battery timely.
Through regular testing and understanding of your car battery, you can essentially preempt issues, save time, and prevent future unexpected car breakdowns.