
Taking off decals from your car might seem like an uphill task, requiring the assistance of a professional.
However, this process can be accomplished single-handedly, within the comfort of your own garage.
This blog will offer a detailed guide to remove these stickers without causing any damage to the car’s paint.
Whether these decals were applied for aesthetic purposes, advertising or simply as a personal expression, the process of removal remains largely uniform.
The post will illustrate various techniques and share practical tips for effective decal removal.
It is hoped that, through these clear instructions, readers can easily and safely complete this task.
Contents [hide]
- How Remove Car Decals?
- A Step-by-Step Guide to Remove Car Decals
- Selecting the Right Tools for Decal Removal
- The Importance of Heating the Decal Before Removal
- How to Use a Hairdryer to Remove Car Decals?
- DIY Tips to Peel off Decals without Damaging the Paint
- Techniques to Remove Adhesive Residue after Decal Removal
- How to Use WD-40 in Car Decal Removal?
- Safety Tips during the Decal Removal Process
- Taking Care of the Car’s Paint Post Decal Removal
- Frequently Asked Questions About Removing Car Decals
- The Bottom Line
How Remove Car Decals?
To remove car decals, start by heating the decal with a hairdryer which will loosen the adhesive and allow for easier peeling. Use a plastic card or a plastic spatula to gently lift the edges, then peel it off slowly to avoid damaging the paint. If any adhesive residue remains, it can be cleaned off using a cleaner such as WD-40 or rubbing alcohol.
In addition to the immediate steps for removing car decals, our comprehensive guide delves into critical precautions and techniques that ensures the safety and preservation of your vehicle’s aesthetic appeal.
You might want to familiarize yourself with the problems that can arise from improper decal removal such as scratches, paint damage or adhesive residue.
Knowing the right tools to use, the best cleaning agents to consider for stubborn adhesive, and some DIY techniques can be incredibly beneficial.
We also cover insights about the varying types of car decals and the factors that affect how they should be removed.
This knowledge can be especially helpful when dealing with difficult or stubborn car decals.
We strive to provide practical and effective solutions for not only your current, but also future car decal issues.
A Step-by-Step Guide to Remove Car Decals
When you purchase a pre-owned vehicle or even a new one, it often comes with various car decals that you would prefer to remove.
Car decals may range from dealership advertisements to outdated bumper stickers.
Although these decals can give the car a unique personality, they can sometimes be an eyesore, especially if they do not align with your personal style.
However, removing these decals can be challenging, especially when aiming not to damage the car’s paint job.
Fortunately, with the right techniques and tools, you can remove car decals safely and effectively.
Understanding Your Car Decals
Before you begin the decal removal process, it is essential to understand your car decals properly.
Some decals are simplistically made and can be peeled away easily.
On the other hand, some decals, especially those designed for exterior use, are made from robust and weather-resistant materials that require more careful handling.
If you attempt to scrape off resilient outdoor decals without preparing your tools and approach, you could end up scratching your car’s paint.
Therefore, understanding the type of decal on your car will guide you on the best approach to removing it without causing damage.
Apart from understanding the type of decal on your car, another crucial factor to consider is the decal’s age.
Decal’s Age and its Impact on Removal Process
The age of the decal may significantly influence the removal process.
Older decals have often been exposed to sunlight and harsh weather conditions, making them more challenging to remove.
Besides, the adhesive used on age-old decals may harden over time, making the removal process more complex.
Therefore, before starting the removal process, consider the decal’s age and adjust your method accordingly.
Gathering the Right Tools for Decal Removal
When it comes to car decal removal, having the right tools accessible is crucial.
Different types of decals require different types of tools for removal.
However, some essential tools usually come in handy regardless of the type of decal.
These tools include a hairdryer or heat gun, plastic scraper or old credit card, and a mild cleanser or adhesive remover.
The heat gun or hairdryer is instrumental in heating the decal, making it easier to peel off.
The old credit card or plastic scraper will be used in gently scraping off the decal.
Lastly, the mild cleanser or adhesive remover will help get rid of any sticky residue left on the car’s surface after the decal has been removed.
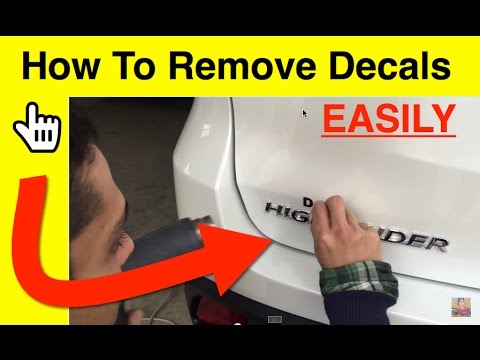
By watching this video, you will gain visual examples and step-by-step guidance on how to get started with your car decal removal process.
The video specifically demonstrates how to use a hairdryer effectively to remove car decals safely and efficiently.
Selecting the Right Tools for Decal Removal
The process of removing car decals necessitates the use of certain specialized tools to ensure a clean and damage-free removal.
Plastic Razor Blades
Often times, standard metal razor blades will be too abrasive and could risk damaging your car’s paint job. In the decal removal process, plastic razor blades are preferred as they are less likely to scratch the car panel’s surface.
Their flexibility allows them to easily slide under the edge of the decal, simplifying the lifting process.
While they might not be as sharp as their metal counterparts, they’re still very effective when coupled with the right removal techniques.
Plastic razor blades are a safe and effective tool for decal removal, minimizing the risk of paint job damage.
Let’s not forget that decals are generally made from vinyl which is soft and flexible. Thus, a plastic razor blade is more than capable of separating it from the car surface.
The application of a gentle, slow, and steady pressure should result in a successful removal.
Heat Gun or Hair Dryer
A heat gun or hair dryer is another tool often used in decal removal. The application of heat is vital in loosening the adhesive bond between the decal and the car’s paint surface.
A hair dryer often proves to be an effective and readily available tool for this task, providing the required heat to soften the adhesive without causing damage.
Heat guns can be employed too, but caution must be applied due to their higher temperature output.
Heat helps to soften the adhesive, making the decal easier to peel off, and reducing the likelihood of residues left behind.
Whichever tool you decide to use for heating, ensure to move it around, avoiding to overheat one spot and potentially damaging the paint underneath.
Also, avoid holding it too close to the car’s surface, always maintaining a reasonable distance.
Adhesive Removers
Completing the toolkit for decal removal is adhesive removers, often imparative when dealing with stubborn residues left behind after removing the decal.
An effective adhesive remover will penetrate and dissolve the adhesive, helping to lift it off from the paint surface.
Products like WD-40 or Goo Gone are examples of readily available adhesive removers that can be used in the decal removal process.
Adhesive removers like WD-40 or Goo Gone can aid in tackling stubborn adhesive residues, completing the removal process.
The magic of these products can be appreciated when dealing with older decals that have been exposed to the elements for an extended period.
Their underlying adhesive tends to harden and prove more difficult to remove, hence the necessity of an effective adhesive remover.
In conclusion, the primary tools needed for effective and safe decal removal from a car include plastic razor blades, a heating tool like a heat gun or hair dryer, and an adhesive remover.
Armed with these, the decal removal process should be a breeze, and most importantly, your car’s paint job will remain intact and unscathed.
The Importance of Heating the Decal Before Removal
When it comes to removing car decals, one crucial step that is often overlooked is the process of heating the decal before removal. This prepares the decal for a successful and clean removal, causing minimal damage to the car’s paint.
The Science Behind Heating
Decals are usually made from vinyl, a type of plastic that responds to heat. When heat is applied, it softens the vinyl, making it easier to peel off.
The adhesive that holds decal to the car body also responds positively to heat. Heat can help to dissolve or weaken the adhesive bond, allowing for easier removal.
The dual impact of heat on both the decal and the adhesive, significantly simplifies the process of removal
This fact is based on the natural characteristic of most adhesives, which tend to lose their grip when exposed to heat.
The use of heat therefore reduces the chances of leaving adhesive residue behind and helps to ensure a clean and smooth result.
Right Amount of Heat
While using heat can be beneficial for decal removal, it’s important to apply the right amount of heat.
Too much heat can damage the paint, while too little won’t have the desired effect on the decal or adhesive.
Finding the right balance of heat is key for successful decal removal
It is advisable to start with a mild heat and gradually increase until it reaches the optimum level where the decal begins to peel off easily without any sign of paint damage.
Thus, the application of heat isn’t just about flipping on a heat gun or hair dryer; it’s a process that requires a careful and considered approach.
This video demonstrates the careful application of heat for successful decal removal. It clearly shows the role that heating plays in ensuring a damage-free decal removal process.
Tools for Heating
The tools used for heating can vary from a commercial-grade heat gun to a common household hairdryer. The principle remains the same: apply sufficient heat to loosen the decal and adhesive.
Despite the tool used, the concept remains to apply slow and even heat, allowing the decal to be gently lifted off.
Using the right tools to precisely apply heat can make a vast difference in the outcome of decal removal
Appropriate use of these heating tools can be learned with a little practice, as seen in the video. You’ll find that with the right technique, even a hairdryer can get the job done competently.
Remember, no matter which heating tool one uses: patience, care and attention to detail will always yield the best results when it comes to removing car decals.
How to Use a Hairdryer to Remove Car Decals?
Many DIY enthusiasts and car owners may not be aware that a standard household hairdryer can be a powerful tool in removing car decals.
The Application of Heat
The application of heat is an integral step in the process of decal removal.
Heat helps to soften the adhesive that secures the decal to the car’s surface, making its removal easier and less damaging to the paint.
Any source of heat can be utilized for this step, but a hairdryer offers easy control and safety.
> The beauty of using a hairdryer lies in our ability to accurately direct its heat towards the decal without overheating the surrounding area or risking any damage.The effectiveness of the heat application depends on the duration and proximity of the heat source to the decal. Because of the hairdryer’s design, it can be held close enough to the decal without causing potential surface warping and also moved easily to apply heat evenly.
How to Use the Hairdryer
To start removing the decal with a hairdryer, first, set the hairdryer to the highest heat setting.
Then, begin applying heat to a corner of the decal from a few inches away, moving the hairdryer in a back and forth motion.
Remember, the goal is to heat the decal to a point where the adhesive beneath softens.
During this stage, it’s important not to place the hairdryer too close to the paint, as excessive heat can damage its finish.
> Spot testing in an inconspicuous area before applying heat to the decal may also be beneficial in preventing unwanted damage to the car’s paint.A successful application of heat will ease the decal removal process and decrease the likelihood of any residue being left behind.
Peeling off the Decal
Once the decal adhesive has softened from the heat, start peeling it off from one edge.
When peeling off the decal, it’s best to do so slowly and cautiously to avoid causing any damage to the paint.
Additionally, as you peel, continue to apply heat to the area immediately ahead of the part you’re removing.
This will ensure that the heat keeps softening the adhesive, allowing for a smooth and clean removal.
> It’s best to peel slowly and in a horizontal motion for optimal results.Once the decal has been fully removed, any remaining adhesive residue on the car’s surface can be easily taken care of with cleaning solutions such as WD-40.
Although maximizing control and safety during the removal process, the use of a hairdryer for decal removal also ensures that your car’s paint job remains flawless throughout the procedure.
DIY Tips to Peel off Decals without Damaging the Paint
Decals, stickers, or badges on cars can add a personal touch, but there may come a time when you want to remove them. However, peeling them off can often damage the paint, leading to costly repairs. What’s the solution then? Below are some DIY tips that will effectively help you remove decals without causing any harm to your car’s paint.
Patience is Crucial
Patience is key when attempting to remove decals from your car. Forceful or hasty removal can lead to scratches or damage the paintwork, thus taking your time is essential.
By adopting a slow and steady approach, you can avoid unnecessary damage, and remember, the process might be time-consuming, but it’s worth it.
By adopting a slow and steady approach, you can avoid unnecessary damage.
A well-maintained paintwork not only gives your car an appealing look but also extends its lifespan.
Using Heat
The utilization of heat is another technique used to remove decals without damaging the car’s paint. Heating the decal with a hairdryer can contribute to an easier and cleaner removal process.

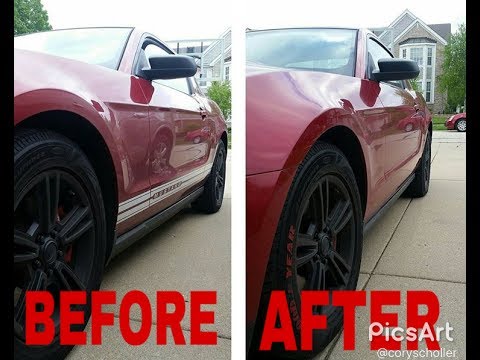
By watching this video, you’ll learn the correct method to use heat for decal removal. It illustrates how to remove decals while minimizing risk of paint damage.
Choosing the right tools
It is essential to choose the right tools for the task. Using sharp objects like knives or razors can easily scratch the car’s surface. Hence it’s advisable to use plastic scrapers or old credit cards.
It is essential to choose the right tools for the task.
These less sharp tools can effectively get under the edge of the decal, allowing for a gentle removal and eliminating the risk of damaging the paint.
Using a Decal Removal Solution
Applying a decal removal solution can assist in loosening the adhesive, making the process smoother. Products like WD-40 or adhesive remover are specifically designed for this purpose and are safe to use on car paint.
Remember – always follow the manufacturer’s instructions on the product’s label to avoid any mishaps.
Overall, removing decals from your car without damaging the paint is a meticulous task, but with patience, the right use of heat, correct tools, and a decal removal solution, you can achieve a clean and damage-free result. It’s all about taking the right steps and precautions.
Techniques to Remove Adhesive Residue after Decal Removal
Removing decals from your car can sometimes leave behind an annoying adhesive residue.
While the decal itself may be gone, this sticky substance can hamper the visual appeal of your vehicle drastically and can be quite difficult to get rid of completely.
Using Commercial Adhesive Removers
When it comes to adhesive removal, commercial adhesive removers can be a good option.
These are specially formulated to break down the adhesive, making it easier to wipe off without damaging your car’s paint.
There are plenty of options available on the market, so you can choose one that best suits your needs.
Follow the instructions carefully on the product to avoid any mishap.
Commercial adhesive removers are potent and can drastically reduce the removal time, handling the bulk of the work for you.
As outlined above, these powerful removers can save you both the effort and time that might involve in a manual removal process.
However, make sure to rinse the area thoroughly post-removal to get rid of any remaining remover residue.
Using Rubbing Alcohol
If you prefer a more DIY approach, rubbing alcohol can be an effective remedy for the removal of adhesive residue.
Apply a generous amount of rubbing alcohol to a cloth and firmly rub the residue until it starts to come off.
Be patient and persistent as the process may take time depending on the strength of the adhesive.
Rubbing alcohol is a safe and cost-effective approach to deal with stubborn adhesive residues on your car.
It is not only easily available but also gentle on your car’s paint.
However, remember to wash the area thoroughly with soap and water after you’re done to remove any leftover alcohol.
Using WD-40
An alternative DIY solution is the use of a product like WD-40.
Simply spray it onto the residue, let it sit for a few minutes and then wipe it away with a clean cloth.
This is particularly effective for removing stubborn or large amounts of residue.
WD-40 is an effective agent in dissolving the adhesive making the removal process pretty straightforward.
However, it’s important to wash and wax the area post removal, as the chemicals in WD-40 can strip the car’s wax.
Again, bear in mind that this method is more suitable for resilient and non-sensitive surfaces on your car.
In conclusion, getting rid of the adhesive residue post decal removal can seem like a daunting task, but with the right tools and techniques, it can be quite straightforward. Whether you decide to use commercial adhesive removers, rubbing alcohol, or WD-40, the key is to be patient and consistent in your efforts. Finally, always remember to clean the area properly post-removal to ensure a clean and shiny finish.How to Use WD-40 in Car Decal Removal?
WD-40 is a versatile product that can be used in various applications, and one excellent use for it is car decal removal. It serves as an effective solution due to its ability to break down the adhesive under the decal and facilitate easy removal.
If you thought WD-40 was only for creaky hinges and rust reduction, think again. The substance is highly versatile, and its applications extend beyond traditional uses. Using it for removing decals from your car is one of those lesser-known uses.
Steps in Using WD-40 for Decal Removal
Before you begin, make sure you have the can of WD-40 and a plastic card or scraper close by. You don’t want to be searching for these when you’re in the middle of the process.
Start by spraying a generous amount of WD-40 directly onto the decal. Make sure you’re focusing on the edges of the decal, as this is where the adhesive is strongest. Allow the solution to sit for a few minutes to give it time to break down the adhesive.
Next, take your plastic card or scraper and start to gently lift the edges of the decal. Keep applying more WD-40 as necessary while lifting the decal, and proceed with caution to avoid scratching your car’s paint.
WD-40’s ability to break down adhesive, combined with gentle scraping, can prove effective in removing decals without damaging your car’s exterior paintwork.
This is a scientifically backed fact, as WD-40 contains ingredients designed to dissolve adhesives. It seeps beneath the decal, breaks down the adhesive, and makes it easier to simply lift and remove the decal.
Remember to clean the surface with soapy water after the decal removal process. Use a clean cloth to dry the area afterwards and remove any residual WD-40.
When to Use WD-40 and Potential Alternatives
Understanding when to use WD-40 is equally important. This substance is best suited for removing decals that have been on your car for a long time, as these are generally more difficult to remove. The adhesive is more stubborn and WD-40 can help break it down efficiently.
After the decal has been removed and the area cleaned, you may notice some adhesive residue. Don’t worry as this residue can also be removed with WD-40 or an adhesive remover for a complete clean.
However, it’s worth noting that WD-40 is not the only solution available. If you don’t have any on hand or prefer a different method, you can try alternatives like hair dryer or heat gun, plastic scraper, adhesive remover, or rubbing alcohol.
You have multiple options at hand for decal removal, so even if WD-40 is not available, you can choose among other methods to achieve a clean, decal-free car exterior.
As with any cleaning or maintenance task, it’s all about choosing the method that works best for you. While some people might swear by WD-40, others might find it easier to use a hairdryer or rubbing alcohol. The choice is yours.
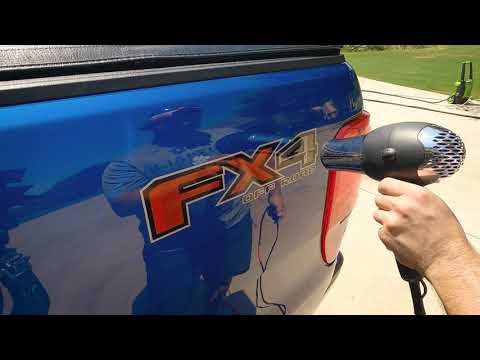
As you try out these decal removal methods, this video tutorial can serve as a handy guide. It provides step-by-step instructions on how to efficiently remove vinyl decals from your car.
For those who prefer visual learning, the aforementioned video can be a great resource. Not only does it offer detailed instructions, but it also provides tips and tricks to ensure that the decal comes off without damaging your car’s paint.
Safety Tips during the Decal Removal Process
Amongst all procedures involved in maintaining a car, decal removal requires an individual to take particular safety measures. Ensuring safety while removing car decals not only prevents damage to the car but also shields yourself from potential harm.
Protective Gear
Working with different substances such as adhesive removers or heat elements can pose a safety hazard if not handled properly. To avert any undesirable outcomes, wearing protective gear is indispensable.
Gloves can protect your hands from burns or harsh chemicals.
Besides, it would be best if you consider using protective glasses to keep your eyes safe from any accidental splashes of chemicals.
In a similar vein, a face mask can ensure you are not inhaling any harmful fumes.
Wearing protective gear while removing car decals shields you from potential harm.
Thus, protective gear doesn’t merely secure your health but also enhances your efficiency as you can work confidently, knowing that you are safe.
Substance Control
Another mandatory safety tip while removing car decals is ensuring substance control, which involves taking necessary precautions while using any adhesive solvents, removers or lubricants like WD-40.
These products contain chemicals that can cause damage when they come in contact with surface areas they weren’t meant for. Thus it is vital to use them sparsely and accurately.
Furthermore, if you accidentally spill or apply to certain sections more than necessary, immediately removing them can avert any possible damage.
Substance control is crucial in preventing unwanted damage to the car surfaces and yourself.
Thus, correct substance control ensures that you avoid causing harm to yourself or your car while maximizing the efficiency of the decal removal process.
Safe Use of Tools
The use of equipment like plastic scrapers, artificial tools, or hairdryers requires a certain level of care and caution. Safe use of tools ensures you avoid any physical harm or any car damage.
For example, when using a hairdryer, one must remember to keep an adequate distance between the tool and the surface to prevent extreme temperature exposure.
Moreover, with scrapers or blades, it’s crucial to maintain a gentle approach to avoid scratching the surface paint.
Correctly using tools not only facilitates decal removal but also prevents potential harm to the car surface or cause injury.
Proper and safe usage of tools is thus fundamental in ensuring an efficient, safe, and damage-free decal removal process.
In conclusion, ensuring safety while removing car decals is of paramount importance. One must remember to wear the necessary protective gear, control the use of substances, and promote safe usage of tools while eradicating the decals. This won’t just guarantee a hassle-free process but also prevent any unintentional casualties.
Taking Care of the Car’s Paint Post Decal Removal
Post decal removal, the car’s paint is typically left vulnerable and requires appropriate care to avoid any long-term damage.
The Importance of a Quality Washing Post-Decal Removal
Following decal removal, it becomes crucial to wash the car thoroughly.
This is necessary to get rid of any residual adhesive and other debris that could potentially damage the paint.
Using a high-quality car shampoo is a good idea as it effectively cleans without causing any harm to the paint.
Rinse thoroughly and ensure all soap residue is removed.
Drying the car by hand using a microfiber towel can help reduce the likelihood of scratches.
A thorough wash post decal removal is not just a clean-up exercise but a crucial step that aids the longevity of your car’s paint.
The quality of the wash and the care put into it can make a significant difference to the car’s appearance and its paint life.
Opting for specialized car cleaning formulas and tools over regular household cleaning products is always a better idea.
Application of Paint Protectants
After cleaning, applying a coat of paint protectant is an essential next step.
There are many forms of protectants available in the market such as waxes, sealants, and ceramic coatings.
These products add a protective layer over the paint, keeping it shielded from the harsh environmental elements.
Not only do they protect against potential damage, but also they enhance the car’s shine and appearance.
The application process may vary depending on the particular product and should be done as per the instructions provided on the product package.
Paint protectants serve as your car’s armor against potential paint damage whilst enhancing its overall look.
Consistent use of paint protectants can prolong the look and condition of your car’s paint.
Given the continuous exposure to various external factors, setting up a routine for application of paint protectants post the wash can surely pay off in the long term.
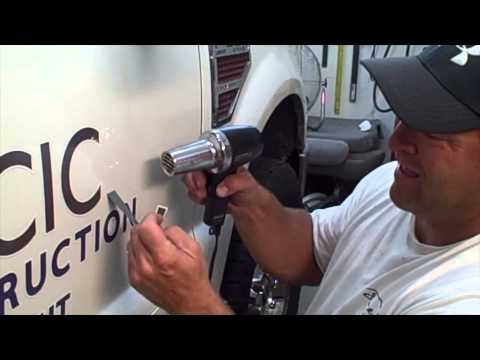
By viewing the linked video, you can gain practical insights into an easy method for removing decals from truck beds.
You will also learn several valuable tips and tricks to ensure a safe decal removal that doesn’t damage your vehicle’s paint.
Post-Care Review and Damage Management
Even with ample care and protection, it’s important to periodically review the condition of the car’s paint.
Look out for any signs of peeling, discoloration, or bubbling as these may indicate damaging effects.
If any damage is noticed, it’s best to get it professionally assessed.
Timely detection and management can prevent further deterioration.
While it may seem cumbersome, including a scheduled review as part of your regular vehicle maintenance can save cost and effort in the long run.
Periodic paint assessment is a proactive step in ensuring the resilience and longevity of your car’s paint.
It provides an opportunity to catch any damage early and prevent it from escalating further.
Maintaining regular checks along with stringent post decal removal care can keep your car’s paint in prime condition, thus enhancing its overall lifespan.
Frequently Asked Questions About Removing Car Decals
Removing car decals can sometimes seem a daunting task, especially to those who have never done it before. However, once you know the correct techniques and tools, it can be a straightforward process. Here are some of the most frequently asked questions about removing car decals.
Can Decals Damage The Paint Underneath?
One of the main concerns many car owners have is whether removing the decals can damage the paint underneath. The answer to this depends mostly on the type of decal used and how it was applied.
Most decals are made to be removable, and if applied correctly, should not cause any damage to the paint. However, if the decal was applied improperly or has been on the car for a very long time, it could potentially cause minor damage when removed.
Despite this possibility, using the correct tools and techniques can greatly reduce the risk of any damage.
Using the correct tools and techniques can greatly reduce the risk of any damage.
This quote emphasizes the importance of being prepared and knowledgeable before you begin the decal removal process. Having the correct tools and understanding the best techniques to use can help you successfully remove the decal without causing any damage.
What Are The Best Tools To Use For Decal Removal?
The best tools to use for decal removal often depend on the type of decal and the material of the car’s surface. However, some of the most common tools include a hairdryer or heat gun, a plastic scraper, a microfiber cloth, and adhesive removers such as WD-40.
A hairdryer or heat gun, a plastic scraper, a microfiber cloth, and adhesive removers such as WD-40 are common tools for decal removal.
This statement highlights the variety of tools that can be used for decal removal. Understanding which tool to use for each stage of the removal process can make the task much easier and more effective.
Can You Use Any Adhesive Remover?
Not all adhesive removers are equal when it comes to removing car decals. Certain types are designed specifically for car surfaces and can make the process much easier, while other types could potentially cause harm to the paint.
WD-40 is a popular choice due to its wide availability and effectiveness. It’s non-abrasive and won’t harm car surfaces, making it a safe and reliable option for removing adhesive residue after decal removal.
WD-40 is a safe and reliable option for removing adhesive residue after decal removal.
This emphasizes the importance of using a suitable adhesive remover when removing car decals. Harmful solutions could harm your car’s paint, whereas using something like WD-40 can effectively remove the adhesive without causing damage.
What Techniques Can I Use to Remove The Residue?
After removing the decal, you’ll probably be left with some adhesive residue. This can be dealt with using a combination of heat, adhesive remover, and a plastic scraper.
Heat the residue with a hairdryer or heat gun and apply the adhesive remover. After letting it sit for a moment, you can then gently scrape it off with the plastic scraper.
Finishing off with a clean microfiber cloth can help ensure all residue is fully removed and your car’s surface is left clean and smooth.
Using a combination of heat, adhesive remover, and a plastic scraper can effectively remove the adhesive residue after decal removal.
This statement emphasizes the multi-step process that is potentially necessary for complete residue removal. Even after the decal itself has been removed, additional steps may need to be taken to remove any lingering adhesive.
In conclusion, removing car decals doesn’t have to be a daunting task. With the right knowledge, tools, and techniques, it’s something that can be done successfully and without causing any damage to your car’s paint.
—The Bottom Line
Effectively removing car decals requires the right tools, techniques, and safety measures.
Heating the decal, for instance, and using a hair dryer can make the entire process smoother while minimizing potential damage to the car’s paint.
Special attention should be given to peeling off the decals and dealing with the adhesive residue.
Substances like WD-40 can also be a good solution to get rid of any residual stickiness without harming the paintwork.
Always remember that safety comes first during the process, and the maintenance of the car’s paint post decal removal should not be overlooked.
Finally, acknowledging and addressing common questions concerning car decal removal can help you best navigate through the task successfully.